A nursery's transition to a big girl's room

Hope everyone had a great Labor Day weekend.  I thought I would share with you today an e-design we recently completed. 

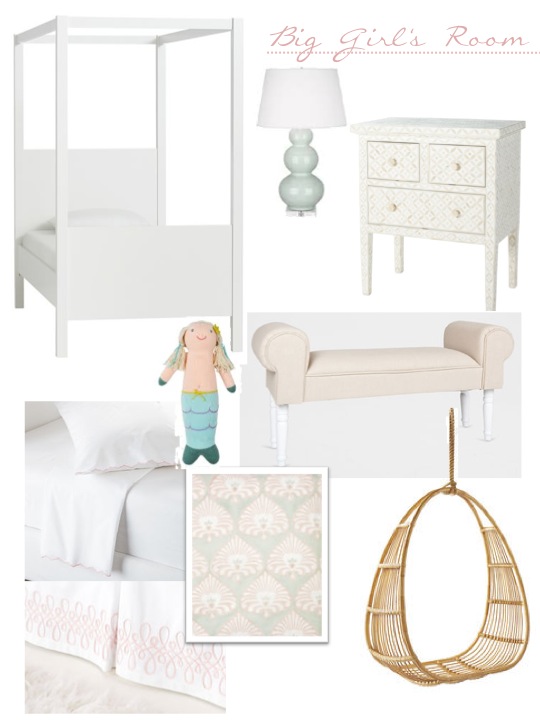
More times than not, we have clients who want to update the look of a room by purchasing a few new pieces rather than starting from scratch. Our client from South Carolina had a beautiful nursery but her daughter was outgrowing her toddler bed. She asked for our help to transition the nursery into a big girl’s room.   

Our objective was to create a youthful design that her daughter would not out-grow for many years to come. We selected a beautiful canopy bed with contemporary lines and a few supporting pieces to tie-in the look with the existing elements in the room. The nursery’s rocking chair was replaced with a fun hanging chair, in a similar tone to the woven shades that are in the room. At bedtime, the bench at the foot of the bed can be used to place stuffed animals and extra pillows.

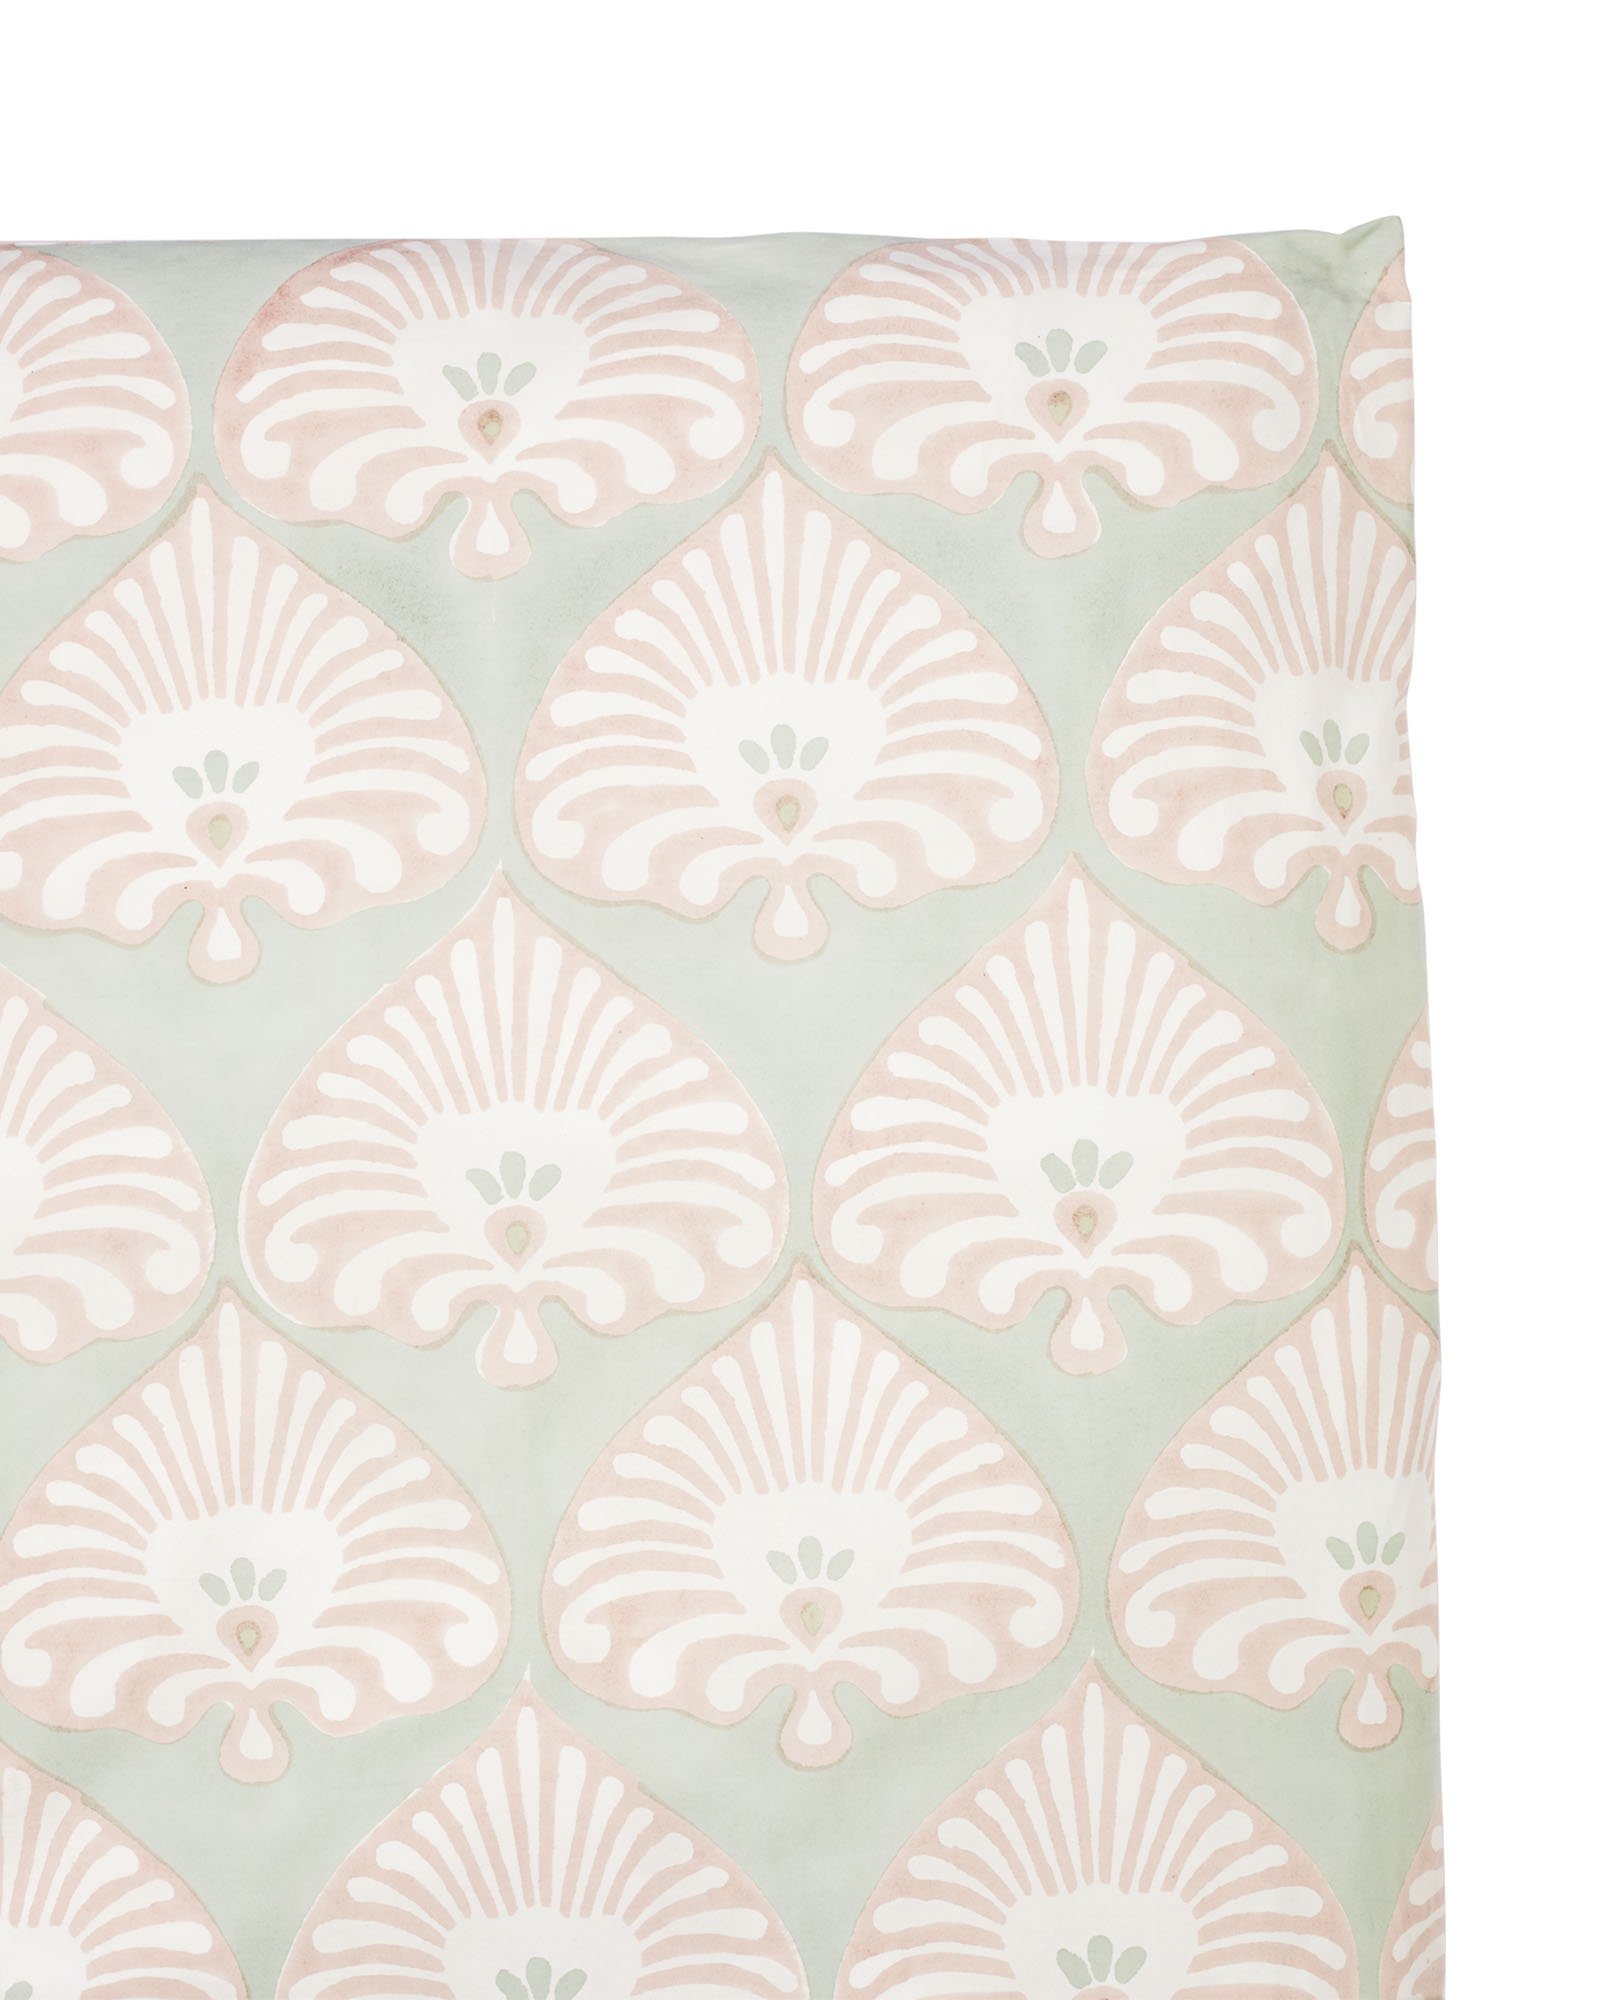
Here is a better image of the duvet cover.

As the years go by and the toys get replaced with clothes and accessories, the room's foundation pieces will remain relevant. We hope it becomes a room her daughter will look back on with many fond memories.

If you are interested in refreshing one of your room's, drop us a line. We would love to help.


Traditional Nursery Lighting Options

As many of you know, my husband Jon and I are expecting our second little girl in the next few weeks.  My due date is actually October 6th, but according to my doctor, I will most likely have her within the next two-three weeks.  I am 35 weeks right now, so hearing that at my appointment yesterday was a bit of a shock! 

If my nesting wasn’t bad enough already, it’s kicked into high gear now!  I shared her last nursery update here, and we’ve accomplished most items on my checklist since then.  There are only a couple of big tasks left-- I’m still waiting on the hardware to arrive for the acrylic frame, and we still need to hang the light fixture.

We attempted (and by we, I mean Jon while I looked on for supervision) to hang the light fixture this past weekend, but we ran into a snag since it’s a vintage find.  Apparently me and my pregnant brain didn’t realize that it was missing the ceiling strap needed to anchor the light to the ceiling.  So now we’ve got to make another run back to the hardware store to fix that problem.  In the meantime, I decided to look into some more lighting options just in case this one doesn’t work once we get it hung up (which would be Jon’s worst nightmare). 

I have no time to waste, and I refuse to let an ugly white ceiling fan ruin the rest of the room so here are a few options I've found. 

traditional nursery lighting options

one // two // three // four // five // six // seven // eight

I'm praying that the one I already have will work because I love the natural patina and vintage crystals it has.  Fingers crossed!  In the meantime, here's an updated shot of the nursery since we hung the wall sconces (pardon the iPhone photo quality and crumpled curtains).  

We're getting so close to meeting our new girl! 

blue traditional vintage girl nursery

Trend Alert: Black Fixtures

A new trend we are seeing more of are black fixtures used in kitchens and baths. This strong color adds contrast and a touch of drama, especially when against a white backdrop. The black finish accentuates the shape of the fixture and it becomes more of a statement rather than just a faucet.

Remodelista

Remodelista

With a variety of styles available, ranging from minimalist to classic, anyone can incorporate the look.

1 // 2 // 3 // 4 // 5 // 6

So, what do you think? Love it or leave it?

Artwork in the Kitchen

One of the most pinned rooms for interiors are kitchens.  It should come as no surprise since it is "the heart of the home" and arguably one of the most used areas for living and entertaining.  Because of this, I think the kitchen needs a little extra attention--mostly in the way of artwork.

Many people shy away or don't even think about having artwork on or over the kitchen counters.  "There's no room for it" they say..."It will get messed up when cooking"..."Are you crazy?"

And I combat those statements with "Yes, there is"..."Not it won't"...and "Definitely not."

Artwork is an excellent way to make your kitchen feel like any other designed space in your home.  It makes the room more personal, is a great talking point and makes a huge difference in the space with little effort.

If you're still weary, let me show you some examples. 

0
false


18 pt
18 pt
0
0

false
false
false


 /* Style Definitions */
table.MsoNormalTable
	{mso-style-name:"Table Normal";
	mso-tstyle-rowband-size:0;
	mso-tstyle-colband-size:0;
	mso-style-noshow:yes;
	mso-style-parent:…

Here's a great example of some little pieces via Lacquered Life.  The picture light makes it even better.

Even without a lot of extra wall space, you can still prop up a small framed piece. (via Decorator's Notebook) 

Even without a lot of extra wall space, you can still prop up a small framed piece. (via Decorator's Notebook

This home was recently featured in Atlanta Homes & Lifestyles, and I may have to give it a full post one day because it is that good.  But, in the meantime, let's enjoy this kitchen. 

This home was recently featured in Atlanta Homes & Lifestyles, and I may have to give it a full post one day because it is that good.  But, in the meantime, let's enjoy this kitchen. 

The wet bar is also a great place to add some art (via Terra Cotta Design).

The wet bar is also a great place to add some art (via Terra Cotta Design).

Lauren Liess has been a design icon for me for awhile, and her previous home's kitchen is a great example why.  Tip: Flea markets and thrift stores are a great place to get vintage oil paintings.

Lauren Liess has been a design icon for me for awhile, and her previous home's kitchen is a great example why.  Tip: Flea markets and thrift stores are a great place to get vintage oil paintings.

Over the stove is another great place to bring in a framed piece. (via The Paper Mulberry)

Over the stove is another great place to bring in a framed piece. (via The Paper Mulberry)

This last one doesn't technically have art, but I love how the leaning wood cutting boards act as a great replacement.  It just goes to show, it doesn't have to be fancy to work! (via The Proper Hunt)

This last one doesn't technically have art, but I love how the leaning wood cutting boards act as a great replacement.  It just goes to show, it doesn't have to be fancy to work! (via The Proper Hunt)

Now go add some art to the heart of your home.  

*Designer tip: Stay away from themed items like pictures of utensils and coffee cups and word art for a more high-end look.

For more inspiration, follow us on PinterestInstagram or subscribe to our posts in the sidebar (or lower bar on your smart phone).

Before and after: Piano Room

Paint has the ability to really transform a space. Recently, we did a color consultation for a client's piano room. As you can see from the image below, they had a gorgeous piano but all the beige and red in the room did not allow the piano to take center stage like it should.

before

To balance the red in the piano, we chose grays with green undertones.  Sherwin Williams paint colors Cityscape and Passive were selected for the walls and trey ceiling. We also helped select a few accessories to pull the room together.

sw cityscape and passive

The wall color now acts as a dramatic backdrop for the piano to really shine.

DSC_1483.JPG

If you are having a hard time pulling the look of your room together, drop us a line. We'd love to help!

Creating a Custom Look Without the Custom Price

Let’s face it—custom work doesn’t come cheap.  Whether it’s custom drapes, custom upholstery or custom art, they will more than come with a high price tag.  But there are ways to save and still achieve a custom look in your home.  Below are a few ideas on achieving a designer look without the custom price.

1. Custom drapery

-Don't use the pocket. First and foremost, do not hang drapery with a rod pocket if at all possible.  Instead, use drapery rings or hooks for a more finished look.   

Curtain pocket vs. curtain rings

Some retailers sell panels with hooks included.  If that’s the case, use them and attach to the rod with an inexpensive set of rings, removing the clasp for a closer hanging.

-Add trim.  Purchase inexpensive, plain panels from Ikea or a discount retailer and dress them up with custom tape trim.  If you’re not an avid sewer, you can use Stitch Witchery and iron it on.

-Hang them high.  We’ve mentioned this several times on here, but it’s worth repeating.  Purchase curtains all long as you can to fit in your ceiling height and hang the curtain rod as high as possible while still allowing the panels to skim the floor like in the image above.  It will make your room and your panels look even grander. Here's a great before/after illustration showing the difference.

2. Custom furniture.

Custom furniture is a costly venture and can often take a lot of time to receive.  Instead, opt for a piece that you can pick up in store at a furniture retailer or discount décor store (HomeGoods!) and then get a local shop to reupholster the back in a different (perhaps more expensive) fabric for a unique look. You can even add embellishments like nailhead trim.  You're left with a custom-look for a fraction of the price!

custom fabric back chair


3.  Custom art.

Instead of the store-bought, mass produced art options, support small business and shop from Etsy or a local artist. To frame the piece, purchase an inexpensive frame from HomeGoods or a craft store and get a custom mat cut to fit the frame.  Opt for a wider mat or off-centered cut for a more custom look.

Try these three tips to update your home with a designer look!